Thinking in React is an article from the official React Doc that talks about the development process for a typical React App
React is, in our opinion, the premier way to build big, fast Web apps with JavaScript. It has scaled very well for us at Facebook and Instagram.
I will be making a simple React App to illustrate the process.
Demo in codepen:
A React App that reminds you of the steps in developing a React App...
Step 0: Start With A Mock
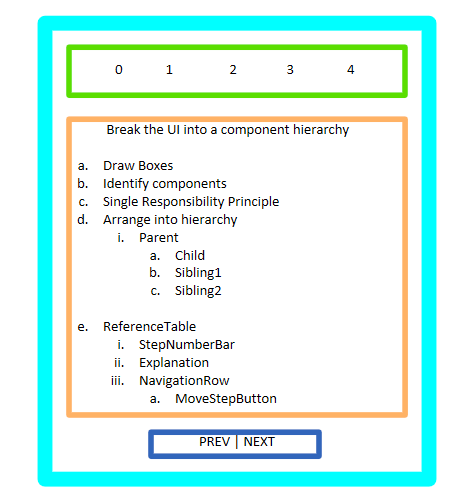
The first thing to do is to have some sort of mental picture of how the App is going to look like. Preferably, have a sketch/mock of the UI.
This is what I came up with:

Secondly, imagine what data from an API/data source will look like. Given that I already have the steps involved in developing a React App and I have it in the following format:
const data = [
  {
    heading: "Start With A Mock",
    content: "Any input from user. Front-end in its plain form",
  },
  {
    heading: "Break The UI Into A Component Hierarchy",
    content:
      "Draw Boxes.Identify components(Single Responsibility Principle)
.Arrange into hierarchy",
  },
  {
    heading: "Build A Static Version",
    content:
      "Don't use state at all, only use Props.Reuse components.
Top down/Bottom up to you.Pass your data model to
the top of the hierarchy",
  },
  {
    heading: "Identify The Minimal Representation of UI State",
    content:
      "Keep only the absolute minimal and compute
everything else on-demand.Is it passed in from a parent via props?
If so, it probably isn't state.
Does it remain unchanged over time? If so, it probably isn’t state.
Can you compute it based on any other state or props in your component?
If so, it isn’t state",
  },
  {
    heading: "Identify Where Your State Should Live",
    content:
      "Identify every component that renders something
based on that state.
Find a common owner component(above all other components).
Create a wrapper component above components if necessary",
  },
  {
    heading: "Add Inverse Data Flow",
    content:
      "Pass state changing callbacks from state owner
to relevant child component",
  },
];
Step 1: Break The UI Into A Component Hierarchy
I started with identifying components from my UI.
- ReferenceTable: container
- StepNumberBar: reflect the current step number
- Explanation: displays the current step details
- KeyList: displays a list of bullet points
- NavigationRow: contains navigation buttons
- MoveStepButton: displays a button
Now that I identified the components in our mock, I arranged them into a hierarchy.
- ReferenceTable
- StepNumberBar
- Explanation
- NavigationRow
Step 2: Build A Static Version in React
Now I started building components top down. This process was a lot of debugging & frustration. Working with sample data helps. Also, focus on getting the skeleton out before you start polishing the components with CSS. But, do throw in some of the centering/alignment CSS along the way so that the App will start to take its shape. No state management at all at this stage.
Some of the basic functional components as follows:
function StepNumberBar({ total, current }) {
  return (
    <div className="stepNumberBar">
      {Array(total)
        .fill(null)
        .map((value, index) => (
          <span
            id={index}
            key={index}
            className={current === index ? "active" : "inactive"}
          >
            {index}
          </span>
        ))}
    </div>
  )
}

function KeyList({ content }) {
  var itemsArr = content.split(".")
  return (
    <ul>
      {itemsArr.map((item, index) => (
        <li key={index}>{item}</li>
      ))}
    </ul>
  )
}

function Explanation({ heading, content }) {
  return (
    <div className="explanation">
      <h2>{heading}</h2>
      <KeyList content={content} />
    </div>
  )
}
function NavigationRow() {
  return (
    <div className="buttons">
      <MoveStepButton direction="prev" />
      <MoveStepButton direction="next" />
    </div>
  )
}

function MoveStepButton({ direction }) {
  return direction === "prev" ? <button>PREV</button> : <button>NEXT</button>
}

function ReferenceTable({ detail }) {
  return (
    <>
      <StepNumberBar total={detail.length} current={currPage} />
      <Explanation
        heading={detail[currPage].heading}
        content={detail[currPage].content}
      />
      <NavigationRow />
    </>
  )
}
Step 3: Identify The Minimal (but complete) Representation Of UI State
Now, thinking of all of the relevant data, I have:
- The step number
- The step detail
Going through the three questions for each piece of data:
- The step number changes when users navigate from one step to another. Hence it is probably state.
- The step detail is passed as props, does not change over time, so that's probably not state.
I ended up with only one state that I manipulated with the useState hook:
const [currPage, updatePage] = useState(0)
Step 4: Identify Where Your State Should Live
Given that the step number needs to be displayed in StepNumberBar and also updated by the buttons in NavigationRow, the state needs to live in one component higher: ReferenceTable.
Step 5: Add Inverse Data Flow
Since components should only update their own state, I passed the update function from ReferenceTable to MoveStepButton that will fire whenever the state should be updated. I used the onClick event to update the state. I also added some cool CSS effect that you can explore here.
Partial code as follows:
function ReferenceTable({ detail }) {
  const [currPage, updatePage] = useState(0)
  return (
    <>
      <StepNumberBar total={detail.length} current={currPage} />
      <Explanation
        heading={detail[currPage].heading}
        content={detail[currPage].content}
      />
      <NavigationRow updatePage={updatePage} />
    </>
  )
}
function NavigationRow({ updatePage }) {
  return (
    <div className="buttons">
      <MoveStepButton updatePage={updatePage} direction="prev" />
      <MoveStepButton updatePage={updatePage} direction="next" />
    </div>
  )
}

function MoveStepButton({ updatePage, direction }) {
  return direction === "prev" ? (
    <button onClick={() => updatePage(curr => (curr === 0 ? 5 : curr - 1))}>
      PREV
    </button>
  ) : (
    <button onClick={() => updatePage(curr => (curr === 5 ? 0 : curr + 1))}>
      NEXT
    </button>
  )
}
Done
As always, more CSS + Polishing. Full code can be found at this repo.
Thank you for reading and have a nice day.

